Instagram is the hottest social media platform right now but no link to your content is frustrating. Find out how to add links to Instagram posts with a landing page!
If you have a blog, a YouTube channel or an e-commerce site, you are probably spending a lot of time promoting your content on various social media platforms. The top ones we favor are Twitter, Facebook, Pinterest, and Instagram. Sadly, Instagram does not allow links on a post. There are solutions out there with 3rd party services but why give them your traffic? Let me tell you how to get your fans on your site AND increase your website’s traffic by showing you how to add links to Instagram posts with a landing page FOR FREE!

The whole point of sharing our content on social media is so our work, service, or products gets discovered. The goal is to get our brand out there to as many people as we can. We want to convert these sets of eyes into new fans and followers to our blogs, YouTube, or other platforms.
The tricky part is getting people of social media platforms and get them on your site ASAP!
NOTE: This post was originally on my blog cultureatz.com. I have kept my slides and Instagram CulturEatz account links intact.
Create Your Own Landing Page for Instagram
We want them to go to our little home on the internet. Pinterest is king for getting traffic but there is no interaction. That is why my favorite social media is Instagram.
I really get to connect with people from all walks of life, not just bloggers in my niche. There are lots of comments being exchanged and you can build a meaningful rapport with your followers. But there is the big roadblock: Instagram links not allowed in posts. What to do?
So how to make a link clickable on Instagram? Easy! By creating an Instagram landing page for website and adding your new page’s link in your Instagram account link: your Instagram link in bio!
I will tell you what are the benefits, and I will show you exactly how to do a landing page for Instagram on your self-hosted WordPress site for free.
I am super pumped to present to you my latest article that is part of my better blogging tips series. Check out some of my previous articles such as tools to find the best hashtags for social media posts and another tool for checking your online grammar.
Benefits of Creating Your Own Linktree For Instagram
So I literally had a facepalm moment last weekend. I had been using the free version of Linktree for a while. I could just add a link and a description for each link in Instagram post I wanted to create, and I also included one for my site and for each social media. Then I just popped my Linktree profile URL in my Instagram bio.
If someone clicked my Linktree link, this is the page they got…

All sounded good to me. Then I received an email to try out a Beta version of a new competitor. It had big bonuses but other things were missing. So I Googled “Best Linktree alternatives”…and that is when I realized I had been shooting myself in the foot all along.
Why? Because I was giving this service MY TRAFFIC! A person had to click on their site – which was not branded to my look like mine at all – and then click a second time to my site. I bet many people gave up after the first click…and they repeated the traffic benefits.
Facepalm! Bang head on wall repeatedly!
Moral of this life lesson: stay away from 3rd party options.
So I decided to figure out how to create a landing page in WordPress on MY SITE and I would reap the WEBSITE TRAFFIC.
Instagram link in bio of your Profile
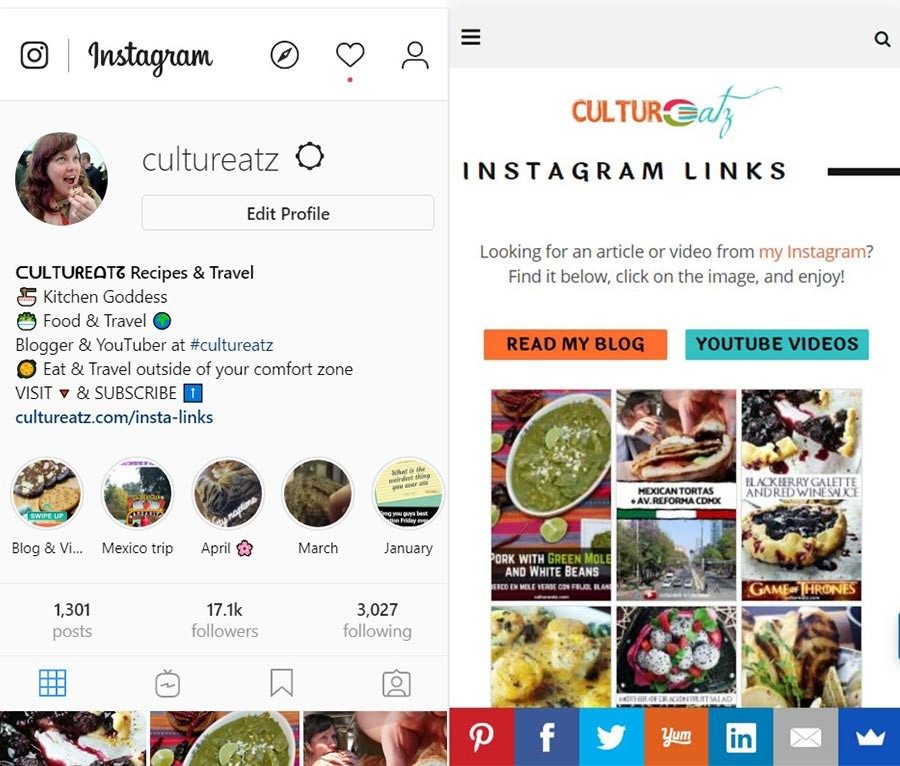
So here is the result of Instagram links page that I put in my Instagram bio https://cultureatz.com/insta-links
On the right, you see a mobile screenshot of my Instagram profile (which you should follow by the way). And on the left, you can see what my land page looks like.

Did you see what I did? I did not just create a Linktree look-a-like. That is what most bloggers do as there are tons of “How To Create Your Own Linktree For Instagram” articles out there. But why would I want to replicate that?
Why not try to replicate my Instagram feed instead? People who click that link in my profile will feel way more at home if they see the familiar Instagram layout. They still have to make one more click to get to the content, but they are already on my site. And my site counts those two clicks of traffic now.
How to create an Instagram page – with this plugin
How long did it take me to create this landing page on a self-hosted WordPress? About 45 minutes.
That is once I found a free plugin that would do exactly what I wanted and all for free, no premium version required. I tried a lot of plugins who wanted my money to get the results I desired before I found one that was free. And that plugin my friends is FooGallery WordPress plugin.
And I am going to show you exactly how I did it.
NOTE: the only exception where you can tag and link a post on Instagram. Did you know you can create a free mobile storefront with Instagram by going through your Facebook business page?
How to add links to Instagram posts with a landing page
There are a few questions you need to ask yourself before starting, and they are:
- What will you call your page and what will be the URL? I went with cultureatz.com/insta-links. Other good choices could be hello, reach out, get in touch, learn more. You get the idea.
- Is your site mobile friendly and responsive? Will it adjust if someone looks at your Instagram landing page on a phone or a tablet? Because you have to think of your link for Instagram as a mobile landing page. A 2015 study showed that 47% of users access Instagram from a smartphone and 53% use a tablet.
- What will be your image format? You need a constant size. Will you add square images? I personally chose to go with my Pinterest image which is already in my media gallery as I use them in my articles anyways and always create one for my videos. I use the same size 600 x 900 pixels every time. Usually, I have the same pic on both Instagram and Pinterest, the Pin image has the added bonus of including the name of my recipe or the topic of my video.
- Should you remove the sidebar? Yes, the goal of this page is to get the user to click on an article. Remove all unnecessary distractions. You could remove the menus and footer too if you want.
- Should you add the link to your main menu? No, this page is really meant for your Instagram fans.
- Should you let Google index your page? I say it is up to you. I decided to let it get indexed.

OK, got all your answers? Let’s start building your Instagram website link
Even if you do not have a lot of website experience, you too can learn how to put a link on Instagram posts. It took me about 45 minutes to build my page and I will be walking you through the steps.
1) Create a new Page
In WordPress, go to Pages and click Add New. I chose the title Instagram Links but shortened my ULR to insta-links after saving my draft.
2) Tell the world what this page is, briefly
I added a little sentence telling people what this age was and I linked to my Instagram account. This is optional.
3) Plug your sites
I created 2 small buttons on Canva.com so I could add a clickable image to my sites: one for my home page and one to my YouTube channel since I am promoting a lot of YouTube videos on Instagram as well.
Remember that this may be the first time a follower actually goes on your site. So make it easy for them to discover all of your content.
Make the buttons small (mine are 154 x 67 pixels) so they show up on the same line on a mobile device. Place them side by side with a little space in between. Center them on your page. Choose colors that are part of your branding.
4) Save your page as a draft
5) Get the FooGallery plugin
Go to Plugins, click Add New, and in the search box type “FooGallery”. Install the plugin and activate it. Find it on the left sidebar menu and click on it.
Click on Add New Gallery and give it a title like ‘Instagram”. The title will not show up on your page. Now before we add content let’s look at the Gallery Setting below.
- Select ‘Responsive Image Gallery’ in the dropdown (it was my default option)
- In the General Tab, Thumbnail Size set your width to 100. If you are using squares, your height will also be 100. If you are using the 600 x 900 Pinterest ratio the height should be 150.
- Link To: custom URL
- Lightbox: None
- Spacing: 5xp
- Alignment: Center
- In the Appearance Tab, set the Border Size to None.
These setting should ensure that once your gallery is published, it will appear on a smartphone as 3 columns, just like your link in Instagram.

6) Add images
Click the box Add Media. This will open up your media library. You can select as many images as you want that are already uploaded, or you can add new ones by clicking Upload Files. There will be a checkmark for all chosen images to be added to this gallery.
For each image, there are 3 boxes you need to fill out:
- Give your image a title. Make sure to include your main keywords.
- Give your image an Alt Text. I use the same as my Title.
- Add the destination URL you want in the Custom URL box. If I am promoting a blog post, I add a link to my article. If it is a YouTube video, I add a link to my Youtube video.
- Once you have done this for every image, click Add Media.
Now you see every image you chose as tiles. You can click them and drag them in the order you like. I always place my new ones on top to follow my Instagram feed. Need to change the URL? Click the “I” on the top left corner of the tile. Want to delete an image, click the “X” on the top right corner of the tile.
Once you are done, go ahead and publish your gallery. You can come back later and add images as you wish and reorder them. Don’t forget to click Update after new changes.
7) You are almost done
Once your gallery is published you will see on the right sidebar your gallery shortcode. Copy everything, including the brackets. It will look something like this:
[ foogallery id=”XXXXX” ]
Now go to Pages in your left menu and select Edit for your new Instagram landing page. Paste your shortcode where you want it to appear on the page. Mine is below my 2 buttons. Now click Publish on your page.
If you go take a look at your page on a desktop or a laptop, it will look something like this. There are 8 images per line on my screen but that is OK. Remember most people will only see this page while on a mobile phone or a tablet.

What you should do is go check your page on your new mobile phone or hit the F12 key on your desktop. This will open up a panel with code.
In the code menu, there will be a box with an arrow, and next to it 2 sized rectangles that look like a phone or a tablet. Click that one. This will give you a preview of how your page will appear on various devices. There are popular sizes set up so you can click the dropdown menu and see how it looks on say an iPhone, an Ipad, a Galaxy, etc. To close the code panel, click the X at the very right of the menu bar.
If you are not seeing 3 columns on your mobile phone you may need to tweak the FooGallery settings a little. But if all went well, you will see 3 columns like in the right pic below.
Don’t forget to update your Instagram bio
And there you go! You now have your Instagram landing page and you know how to add a link to an Instagram post. Copy the URL of your page and go change the link in your Instagram bio.
Now, every time you want to post an image on Instagram that is meant to promote your content, make sure to add it also to your FooGgallery in WordPress first, it will automatically update your landing page.
And tell your Instagram followers how to go visit your content. I always add a sentence along these lines to each post: Tap @cultureatz and click the link in our bio for #recipe
Bye Bye Linktree and hello to getting more traffic on your site and having more people discovering your amazing content!
PIN IT HERE for later!

More from the Better Blogging Tips series: